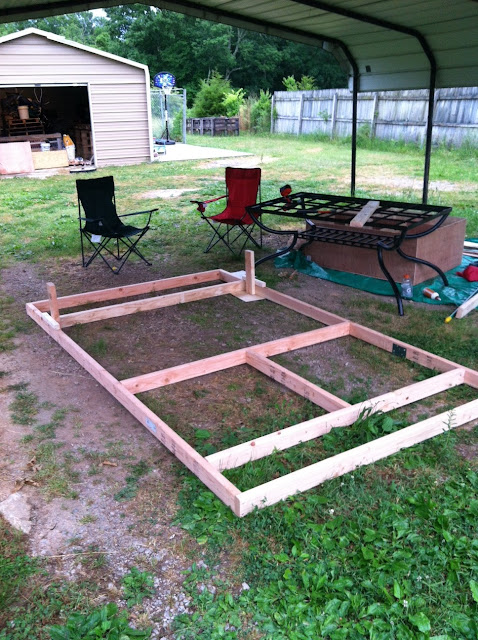
I got the bottom frame and the nesting boxes put together. I didn't rush too much because the metal doesn't arrive until mid-week, so even if I had the thing 100% framed, I still couldn't have finished.
Plus the tires need air.
Anyway, I gathered what I had to get started:
 |
| Materials assembled, I was ready to get to work building my movable chicken coop. |
To start, here's my complete materials list:
- (20) 8' 2x4's for the frame
- (2) 8' x 4' sheets of 1/4" thick plywood for the nest boxes and door frames
- (3) rolls of 10' by 3' hardward cloth, with 1/2" spacings
- (6) 8' 2x2 furring strips roosting perches
- (2) 26" reclaimed mountain bike tires
- (1) 8' long, 3/8" diamter metal rod
- (6) 3" gate hinges
- (2) gate bolt locks
- Several pieces of 3' wide metal roofing/siding (not pictured - still on order - will go into detail later)
- Boxes of 1" roofing nails and 1" and 1.5" wood screws
- Misc. scrap metal pieces for reinforcement
- Box of misc. sized finishing nails
- Measuring tape, hammer, wood glue, drill with 5/32" and 3/8" carbide bits, circular saw, ratchet set, work gloves, ear protection (for the saw), and other misc holding/clamping/pounding tools, a la carte
Most of this stuff is pictured above, with the obvious exception being the metal. Oh well - can't win 'em all.
The first thing i did was to start cutting. I got my cut sheet out, and tackled the plywood first.
I had made sure to make detailed measurements, and assembled them in a cut sheet to make sure I only need 2 sheets of plywood. I had lots left over.
 |
| My scribbled cut sheet for the plywood nest boxes and door frame assemblies. WARNING: Drawing not to scale. Nope, not even close. |
I put it together using wood glue and finishing nails. With only 1/4" thickness, I couldn't use big heavy screws. I'll use wood screws later to bolt the next boxes to the frame for added durability.
They looked bigger in person than I imagined form the drawing.
But with 6 Jersey Giants waiting in the Chick-u-bator, I wanted to be sure to...ahem...accommodate their...ahem...grandeur?
 |
| 18" x 18" x 18" next boxes seemed excessive. Then I remembered the Jersey Giants...... |
| Oh yeah....I gotta fit some of these things..... Image @ www.backyardchickens.com |
Once the box assembly was built, I started the actual coop framing. I started with the axle assembly, drilling a single hole through two stacked 2x4's to ensure a true hole. I then lined the inside with spare sheet metal for extra security, leaving 2 inches above where the axle will lie and an inch and a half underneath. The extra width will provide extra durability given the weight coming from above. I centered the drill holes at the 2-to-1.5 point.
 |
| These 2x4's will support the wheels of the movable chicken coop. I drilled the holes and added extra metal support plates on the insides of the wood. |
Once the axle frames were done, I went about building the rest of the bottom frame. I allowed a full 3 feet spacing for the 26" tires, figured if I upgrade tires at some point, I'll have extra room. I also made sure to get a very true 10-feet by 6-feet outer edge frame. I missed the 10' side by 1/8". Bummer.
I also added an extra support beam at the handle side so I can bolt the next boxes down to the frame. I included some 15" posts than the coop will rest on for stability (imagine a rickshaw - 2 wheel, 2 posts, 2 handles - that's the final vision here) when in the field. I also framed the center support for the axles. I will get wheel wells put in once I get air in the tires.
 |
| The bottom frame of the movable chicken coop. You can see the nest box assembly laying on the tarp next to my cutting table. And look! The chick-u-bator is int he shed in the background! |
From here, it's cutting and building the frame, adding the tires, and then lining the floor with hardware cloth. The final steps (before clipping the chickens' wings and loadin' 'em on in) are attaching the metal panels, then building the doors.
Ready for more! Read Part 2!

We, the Professional Locksmith Company in Jacksonville FL allow the customers to be carefree about their lock problems.
ReplyDeleteI found this is an informative and interesting post so i think so it is very useful and knowledgeable. I would like to thank you for the efforts you have made in writing this article.
ReplyDeleteIt’s time to avail this service Carpet Cleaner Service in USA visit here for more details.